• Skip to primary navigation
  • Skip to main content
  • Skip to primary sidebar
Sweet Cs Designs
  • Recipes
    • Appetizers
    • Breakfast
    • Beef
    • Burgers & Sandwiches
    • Candy & Sweets
    • Chicken
    • Cookies
    • Dessert
    • Drinks
      • Moonshine
    • keto
    • Main Dishes
    • One Pot
    • paleo
    • Pasta
    • Pork
    • Salads
    • Seafood
    • Slow Cooker
    • Side Dishes
    • Vegan
  • Traveling
    • United States
    • Europe
    • Mexico
    • Cruising
    • How To Fly Free
  • Holidays
    • 4th of July
    • Birthday
    • Christmas
    • Cinco de Mayo
    • easter
    • Fall
    • fathers day
    • Halloween
  • DIY
  • Subscribe
  • Instagram
  • Navigation Menu: Social Icons

    • Facebook
    • Instagram
    • Pinterest
    • TikTok
    • Twitter
    • YouTube

Wine Cork Christmas Tree

December 2, 2012 by Courtney ODell 9 Comments

5096 shares
  • Share
  • Tweet

For Christmas this year, I have been trying to find some fun and original decor that not only fits our home decor, but is childproof.

Glass ornament wreaths, fragile displays, and easy to tear apart centerpieces are out with baby B on the move and little man in an especially grabby phase.

I wanted something that would be a fun, stylish addition to a winter wine tasting (more on that soon), but could also be displayed anywhere in our home- and not break.

I’ve seen lots of great wine wreaths and trivets and decided corks would make a fun rustic tree!

Here’s how I did it (in under 20 minutes- for under $5):

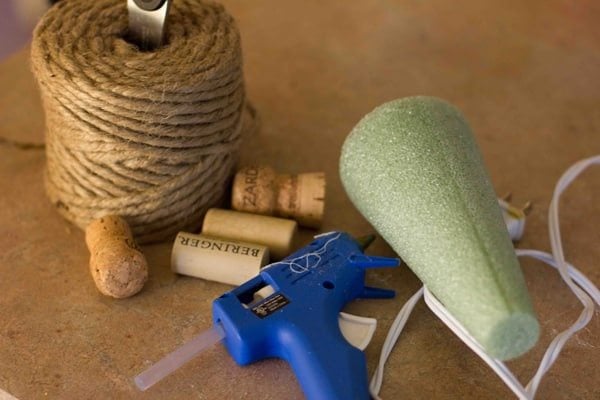
You will need:

-jute ribbon (i always have this on hand- it is so cheap- you can find it in the jewelry section of your craft store)

-foam cone tree, any size

-wine corks (and a champagne cork for the topper)

-hot glue gun

-very sharp knife and a little bit of technique

First off, you’ll need to estimate how many corks you’ll need, depending on your cone size. I used about 15 for the 6″ cone.

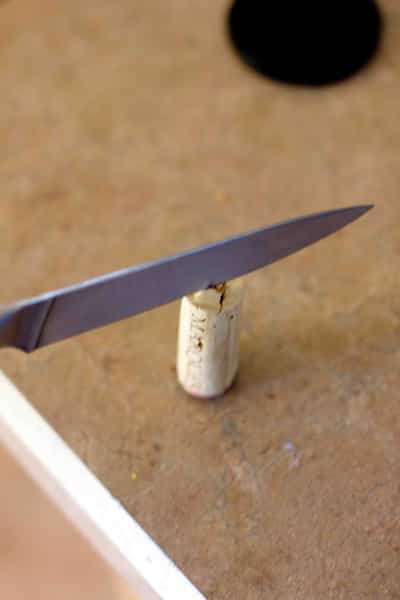
Next, you are going to cut your corks in half to make them lay flat and display better. At first, this might seem pretty tricky- but I found a way to speed it up and save your arms.

Stand the cork up on an end, and firmly hold the top with one hand (make sure your fingers are NOT in the way). With your other hand on the knife, make strong, sweeping motions downwards to cut- so you will basically be pushing the knife down and in towards you as you go. This is much faster than using a sawing style method to cut the corks… trust me.

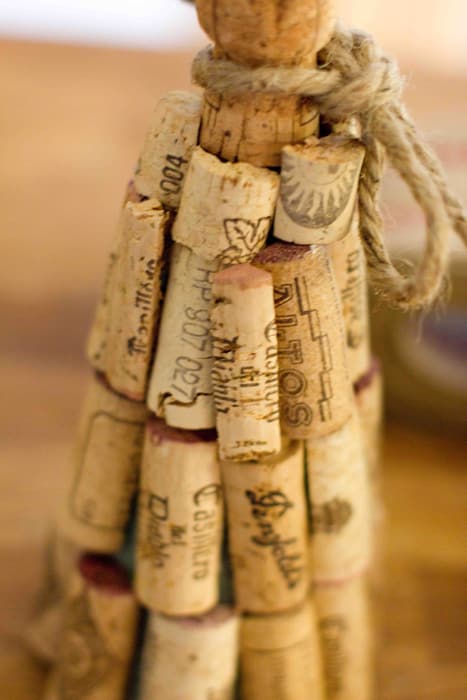
Next, start gluing the corks on. Start off by just placing them next to each other, but as you start to get around curves in the cone, you’ll leave some of the cone area uncovered so your corks arent all wonky looking. Keep them upright, not tilted (we’ll fill in the bare spots in a bit).

Continue as many layers as you need for your height cone.

If your cone is not tall enough for another layer of corks (like mine), simply cut your flat corks in half lengthwise to make a mini layer at the top.

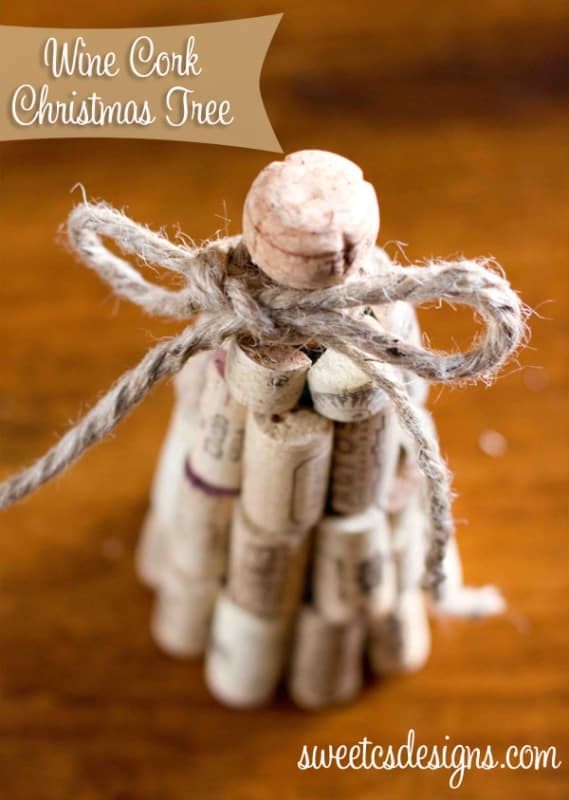
Glue a champagne cork in the middle of the cone’s top.

Next, slice any remaining cork halves into fourths. Find any bare spots on your cone and fill them with these cork slivers. (You wont have very many for the smaller cones- maybe 4-5).

Once all your areas are covered, tie a string of jute around the top, and display as a part of your tablescape! (see mine coming up soon!!)

Filed Under: Christmas, Holidays, home decor, party planning

About Courtney ODell

Courtney loves to share great wine, good food, and loves to explore far flung places- all while masting an everyday elegant and easy style. Courtney writes the popular creative lifestyle blog Sweet C’s Designs- a site devoted to delicious everyday recipes, home decor, crafts, DIY inspiration, and photography tips to help make your every day extraordinary.
Advertising, media and other inquiries- please contact hello@sweetcsdesigns.com

free email series

Fridge to Fork
in 30 Minutes or Less

My “GO-TO” recipes to make dinnertime delicious & stress-free

Reader Interactions

Comments

  1. Jennay

    January 18, 2013 at 4:16 pm

    I <3 your blog! =) Thank you for sharing and inspiring us all!! I mentioned earlier in the comments above that I would host this particular DIY project on my DIY Friday posts and I did. I forgot to come back and link it so you could see my example! I had alot of fun doing this project and just wanted to thank you for your wonderful blog!

    Here it is if you would like to check it out! http://adayinthelifeofjennay.wordpress.com/2012/12/16/diy-wine-cork-christmas-tree/

    Reply
  2. Connie

    December 10, 2012 at 11:24 am

    OMG I LOVE this. Now I just need to find out where to get me some corks!

    Reply
  3. Heather

    December 9, 2012 at 4:21 pm

    Love this tree and that it is so quick to make! Your photos are beautiful!

    Reply
  4. Bonnie and Trish @ Uncommon

    December 2, 2012 at 9:49 pm

    What a great idea! Turned out wonderful!!

    Reply
  5. Vanessa Barker

    December 2, 2012 at 9:49 pm

    Darling!! I love the rustic/vintage look

    Reply
  6. Jennay

    December 2, 2012 at 4:19 pm

    I <3 this idea!! Such a fun project…will host this on my DIY Friday post coming up on a future blog post! Thanks for sharing…will link all credits back to you!! =)

    Reply
  7. kelsey

    December 2, 2012 at 1:34 pm

    Love it and so easy! I have cones and corks!!

    Reply

Trackbacks

  1. 20 Wine Inspired Projects says:
    February 13, 2013 at 6:30 pm

    […] Wine Cork Christmas Tree from Sweet C’s Designs […]

    Reply
  2. DIY Wine Cork Christmas Tree!! – A Day In the Life of Jennay says:
    December 16, 2012 at 3:00 pm

    […] her blog post here to find out how to make your own Wine Cork Christmas […]

    Reply

Leave a Reply Cancel reply

Your email address will not be published. Required fields are marked *

Primary Sidebar

About Courtney

Hi- I'm Courtney O'Dell, the writer and photographer behind Sweet C's. I’m a travel obsessed foodie and mom of two sharing the best recipes, tips ... more about me!

  • Keto Recipes
  • Appetizers
  • Main Dishes
  • Side Dishes
  • Drinks
  • Desserts
  • Instant Pot
  • Air Fryer
  • Web Stories
  • Travel
broiled lobster tails on a baking sheet with lemon slices next to them
smoked meatloaf on a plate
lobster tails seasoned with paprika and butter on a white plate with chopped parsley on top with lemons on the plate next to it
roasted prime rib sliced on a wood cutting board
air fried french fries in a glass jar
sliced pork tenderloin on aluminum foil in a garlic butter sauce with parsley on top

free email series

My “GO-TO” recipes to make dinnertime stress-free

Trending Travel

a slice of cucumber being dipped into tzatziki sauce in an orange cup
picture of tbilisi georgia
Houses in Killarney, Ireland

More Travel

Footer

^ back to top

About

  • Privacy Policy

Newsletter

  • Sign Up! for emails and updates
  • Sponsor the Sweet C's newsletter here.

Contact

  • Contact
  • Media Kit
  • FAQ

We are a participant in the Amazon Services LLC Associates Program, an affiliate advertising program designed to provide a means for us to earn fees by linking to Amazon.com and affiliated sites.