5 Minute Fabric Rosette Tutorial
Jun 10, 2012, Updated Apr 17, 2024
This post contains affiliate links. Please read our disclosure policy.

I absolutely love fabric rosettes. I never make them though because I never have long enough fabric. With the help of some Mod Podge though, I recently made some using a fat quarter.
I always pick up fat quarters in the store because they are so inexpensive and I am a bit of a fabric hoarder.
I have a huge pile of them. They gotta go.
So, I’ve been rolling up a bunch of these little cuties! They are so easy, and are perfect for headbands, as pins, homemade jewelry… tons of things.
I know there are tons of ways out there to make fabric rosettes, but I love this technique because it is super simple, super quick, and really requires very little skill. If you can twist and roll fabric and dab some glue, you’re golden. Really.
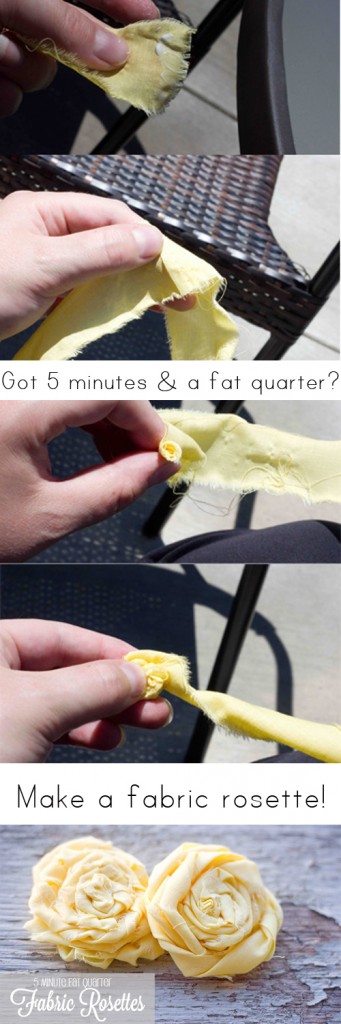
Here’s how I make them:
First, cut a tiny slit in your fat quarter about 2″ in. Tear the fabric to make a 2″ strip. Repeat to make another.
Apply a line of mod podge to the end of one of the strips, and “glue” the fabric strips together to make a long strip. Of course, if you want a smaller rosette, you can skip this. Or you could add a third for a huge rosette. Totally up to you!

Start rolling the fabric. Keep rolling and twisting until you have a full flower.

Save about 1″ of fabric at the end to mod podge onto the back of your rosette to hold it all in place. Add dabs of mod podge wherever you feel the rosette could use a little extra adhesive.
I know you are asking yourself, “will the mod podge really hold it in place”? It will.
This stuff is magic, yo.
I made these while little man was playing outside, since they dont use any big tools to make and I can set up a little station on our outdoor dining table. It is also something easy I can put down if I have to help him- you can just re-twist or glue your rosette together as is and finish rolling it later. (“Pause-able” crafts are a necessity here lately.)
Add as an accessory to whatever you’d like! I am working on a basket full of these to have on hand. Maybe a cute headband post is in the future here :)!
What is your favorite fat quarter craft?
Congrats to Liza from Views From the Ville on winning the Mod Podge Prize Pack! Can’t wait to hear how much you love the book and see what you create with your mod podge!


Thank you for sharing such a cute and easy tutorial! Love it. Pinned it too! -K
LOVED this post, please link it with me tomorrow at Wow Us Wednesday!
What are fat quarters? What kind of fabric did you use? Not sure what the roll and twist concept is. If I’m leaving 1 inc for the back, do I cut the fabric and glue it or just wrap around to the back.. I’m really craft challenged.
Kim- no problem I just recently found out about fat quarters! They are pre-cut measurements (1/4 yard) you can pick up from fabric stores instead of buying a whole yard. They are under $2. They are used for quilts, but I am a fabric hoarder and I love to find other ways to use them like purses, headbands, etc.
As far as the twisting, you are going to twist the fabric strip while making a circle shape with it, like a snail shell. This is just to give it some depth and texture, and there is no right or wrong way to do it. You will find what you like as you go- some I twist more, some less. As far as the back, you just wrap it around, like gluing a base on your flower. Really it is to help it from coming undone. Let me know if that helps!
I love these types of flowers! They work on SO many things! Great job!
This is a great tutorial and they turned out beautiful! I’d love to invite you to join us on Saturday Show & Tell at Cheerios and Lattes! I know my readers would love this idea too!
Have a great weekend!
Mackenzie 🙂
http://www.cheeriosandlattes.com/saturday-show-tell-15/
the easy things always turn out cutest! super sweet ?