This post contains affiliate links. Please read our disclosure policy.
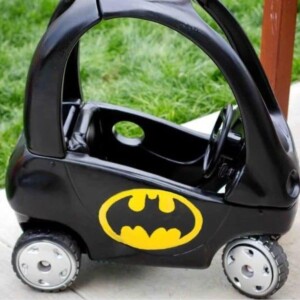
Make your kid a superhero this year – turn your Cozy Coupe car into a Batmobile with this easy craft idea using just spray paint and a simple stencil or stickers!

Table of contents
Toy Car Batmobile
What little kid doesn’t want to be a super hero? The cool capes, the rad theme song, a trusty sidekick- and some awesome wheels. If you’re Batman, you get the best of all- the Batmobile. And what kid doesnt want a kid’s Batmobile? Luckily with a cozy coupe kids car, you cab get your little caped crusader swinging around the block in style in just about no time at all with this awesome way to make your own Batmobile.
All it takes is a little paint, spray paint or vinyl and a printer, exacto knife or a cricut and the Batman cartridge and you’re on your way!
Now, since there was no tutorial for this wonderful gem I saw on Pinterest (after hours and hours of searching), I came up with my own- and while cursing under my breath at my method, I came up with a few other ideas as well that would save you from a visit by the f-bomb fairy. She and I are tight after this logo, let me tell you.
Even though I had a few stumbles, the whole project took less than 45 minutes, minus drying time. If you use vinyl, it would be an under 20 minute craft- you really can make it quickly!!
First off, I took this funky cozy coupe my mom found at a thrift shop for $7.

(note my son’s relaxed driving apparel)
How I Made a Cozy Coupe Batmobile
I spray painted the entire thing using 2 cans of Krylon fusion spray paint- it goes on smoothly and sticks to plastic without priming or sanding. I did try another brand, but it dripped pretty badly. Overall, spraypainting the car black took like 5 minutes and was super easy.
After letting it dry for 30 minutes, I thought it was done, and my son excitedly ran to grab it. Big mistake- and major catastrophe. Kids skin and spray paint is not a fun match!
A few hours later, it really was completely dry, and I cut out a batman logo shape from the Cricut Batman Cartridge with my cricut onto some plain white paper. I used the inverse of the shape and the outline to use as a spraypaint stencil that I taped to the car. I wanted the logo to be spray painted on- but while I love the final results, it was a major pain. More on that in a bit- but here’s how the stencil looked taped on:
I then carefully painted the logo in yellow, trying to avoid drips. Unfortunately, drips happened. They happened something fierce, and the stencil lines got pretty funky.

Tips and Tricks to Making a Cozy Coupe Batmobile
If you get drips, or uneven edges, you can do what I did and fix it by hand. I sprayed a bunch of paint in a paper cup and painted it on by hand, which worked great- but it wasn’t the easiest or least stressful way to do it. You have to be careful when handpainting with spraypaint to not add too thick a layer- or it all scrapes off- kind of like what happens when you add nail polish on too thickly.
Use a pre-made sticker. This 14″ sticker is pre-made and perfect, so you can simply paint your car black and paint the wheels chrome, then you’re ready to go! This is the easiest, best option, but was not available 10 years ago when I first made this.
Make a vinyl sticker. Instead of spraying on the logo, you could either make some out of tape or vinyl and adhere it to the car- or you could spray yellow paint into a paper cup and stencil it on with a stencil brush or sponge.
Use enamel paint. You could also use yellow enamel paint- but acrylic might not fare as well outside as the plastic spray paint or an enamel.
Paint the wheels chrome. To finish it up, I painted the wheels a metallic color to look like chrome… every little boy needs a chromed out car, right?
How to Make a Cozy Coupe Batmobile
How to Make a Cozy Coupe Batmobile
Equipment
- Cricut, or x-acto knife
- Large batman logo
Ingredients
- 1 used cozy coupe car
- 1 can black spray paint
- 1 can yellow spray paint, yellow enamel paint, or yellow vinyl (if painting)
- Paper or stencil material, unless making a vinyl sticker
- Batman sticker, best method
- Painters tape, if making stencil
- 1 can chrome spray paint
Instructions
- Clean cozy coupe car well, removing any dirt, oil, grime. If it is really banged up, you can sand rough edges to make it smoother! Let fully dry.
- Using black Krylon fusion (or other plastic-specific spray paint), spray entire cozy coupe, inside and outside, so entire car is black. Let fully dry, about 40 minutes.


This is the coolest thing I have seen in a while! You truly made the boring kids cars that I see everywhere into something super cool! I’ve actually been eyeing these off for my 2 year old but thought they were a bit ugly, but you have inspired me to do a make-over and change it into a princess car instead! You are so clever – love it!
I think it’s amazing and I’m gonna try tomorrow morning but had a question how it the paint holding up now after these many years
Woooow…I can’t believe you actually made a tutorial on how to do something so EASY…you said so many steps!..just buy the freaking thing, paint all of it black, print a batman logo, cut it into a templet and paint it in…how freaking hard is that?!?!?, I just lost 10 minutes of my life reading your step by step, its not brain surgery…what are you going to tutorial next…how to make a bowl of cereal!!! Seriously you suck.!!!
Are you always such a jerk??
Wow You are ass, if you knew how to do it then why did you read it in the first place. I think most of us had an idea what to do. I believe the autohor was trying to help by telling what worked well, what didn’t , what may work better, type of paints, etc which is exactly what I was hoping for. Didn’t your mother ever teach you “if you don’t have anything nice to say , keep your mouth shut”?? Talk about waste of time, you really must have nothing fulfilling in your life if you sit around and read how to articles about things you claim you know how to do and TROLL the comments.
Thank you! I really needed a little help! My Grandson loves it.