This post contains affiliate links. Please read our disclosure policy.
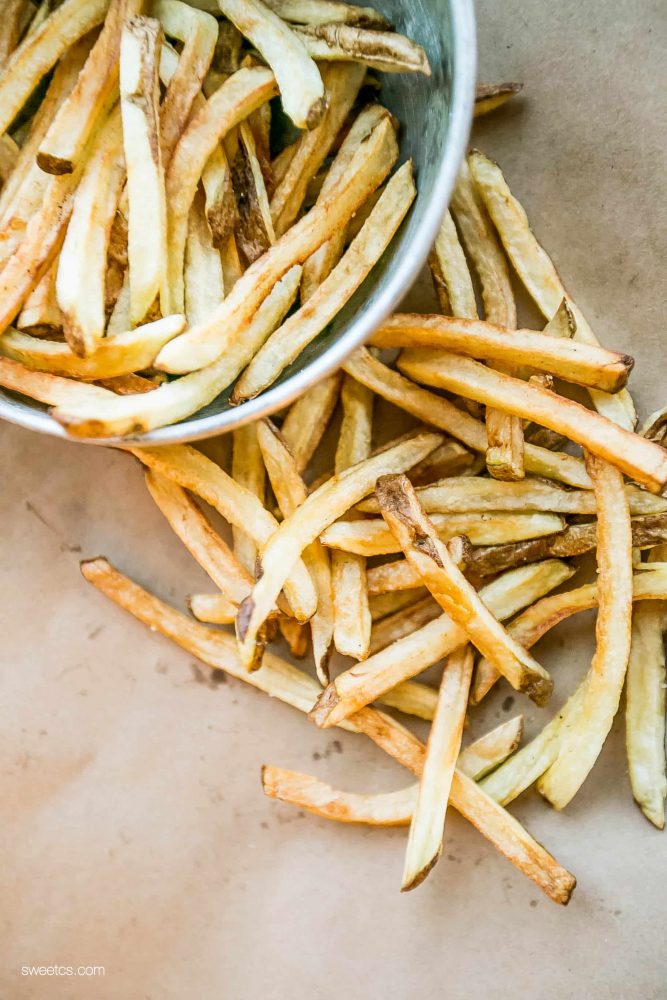
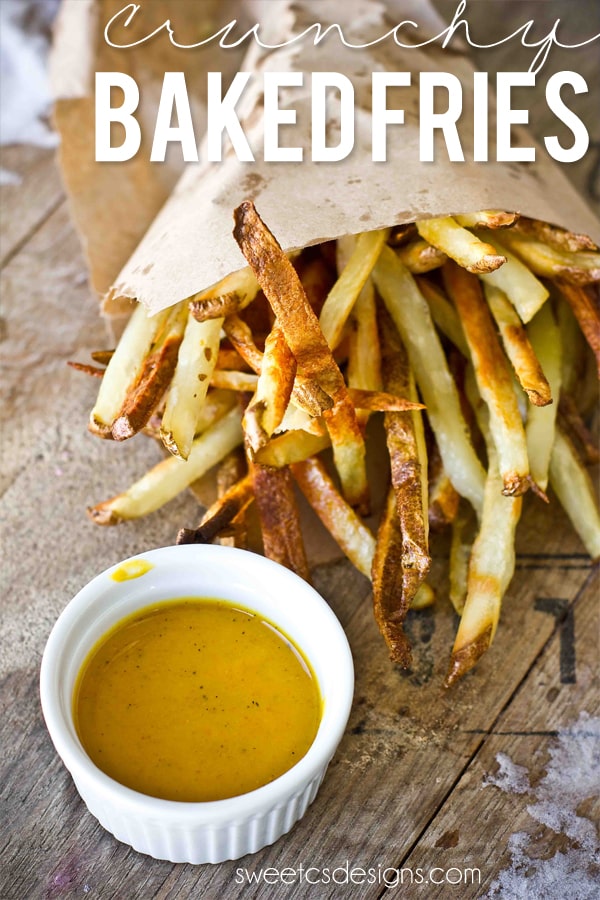
Crunchy Baked Fries Recipe – delicious restaurant style French fries – straight from the oven – for a delicious golden brown and crispy baked French fry recipe that is sure to become your family’s favorite.

Don’t want all the extras in a recipe post? We provide a skip to recipe button in the top left corner, as well as a clickable table of contents, just below, to help make this page easier to navigate.
At Sweet C’s, I add lots of tips in all of my recipes – because I am a home cook without any formal training, and I find I am more confident making dishes when I understand why it works, and what each ingredient means to the flavor of a recipe. My goal is for even the most beginner home cook to feel empowered in the kitchen.
Baked Fries
We LOVE fries in this house. Sweet Potato, Potato- fried or breaded- we just love fries! The problem is, we know high fat fries aren’t the best for us.
This recipe for Crunchy Baked Fries gives you the crispy, crunchy texture of fried fries, but with a little heart healthy olive oil and sea salt for a lightened up version.
These fries use a dash of heart healthy olive oil and are baked at a high temperature to help cut down on some of the unneeded fat of fries- and they are so good, you won’t even notice they are baked.
While we don’t eat them often, these are gone in a few minutes when we do- and the best part- they are totally easy!
I get a ton of questions and comments on my posts, so I try to provide as much information as possible for my readers.
If you’re looking to bypass all the helpful tips, please click on the “skip to recipe” button in the top left corner, or scroll to the bottom of the page where you will find the recipe for these crunchy baked fries!
How to Bake French Fries
To make this recipe, we will need the following ingredients:
- Russet potatoes
- Olive oil
- Sea salt and pepper, to taste
Once you’ve gathered your ingredients, we will use the following process:
- Prep. Using a mandoline, slice the potatoes into fries. I don’t worry too much about the size of fry I am making- some are bigger, and some are smaller. That’s fine! Next, place your spuds in a nice cool water bath. Completely submerge the fries in water.
- Soak. Let fries sit one hour. This helps to remove excess starch and will help the fries crisp up more in the oven. After an hour, drain the water, and pat fries dry with a paper towel.
- Bake. Toss with a couple tablespoons of olive oil, salt and pepper. Spread out onto a baking sheet which has been generously sprayed with cooking spray (two if the sheet is too crowded- fries should not be super packed on the sheet). Bake at 400 for about 30 minutes- until fries start to get soft. You might want to stir the fries at this point to prevent excessive sticking and to flip the fries to the other side.
- Crisp. Turn the oven to 450 and continue baking until crisp (about 20-30 minutes). If you get in a hurry, turn on the broiler to crisp up the fries- but watch them closely, and stir them a few times to be sure all sides get some good crunch!
Tips and Tricks to Perfect Crunchy Baked Fries
These easy tips and tricks will help to ensure the best crunchy baked french fries, every time!
Cut With a Mandoline. Cut potatoes with a mandoline for easy, perfect sticks that will crisp up well.
Let Them Soak. Make sure your fries soak for at least one hour – preferably changing the water after 30 minutes to new cold water. Soaking in water helps remove some of the starch, which will help them crisp up better!
Pat Dry. Make sure your fries are VERY dry after their little bath. Pat them with paper towels or a clean dish towel to be sure there is no residual moisture. Wet fries = soggy fries.
Prep Baking Sheets. Ensure your baking sheets are well greased, or your fries will stick and become a nightmare. Aluminum foil works in many situations, but my fries always stick to foil as well – so be sure to use plenty of cooking spray if you do. If lining your baking sheet, I suggest parchment paper or a silicone mat, and I still use an olive oil based cooking spray for those as well.
Give Them Space. Always cook fries in a single layer. Allowing fries to bake separate from each other will help them get crunchy.
Adjust cook time as needed. I watch my french fries closely while cooking, and make adjustments as needed. Every oven is different, and I’ve noticed a ton of things impact cook time and even something as small as the humidity in the air can impact cooktime.
Reheating Leftover Fries. This recipe is good as a side for about 6 people. The fries are best eaten hot- but you can add a dash of oil in a pan, as well as some garlic to heat them a second time. Learn more about reheating fries in my post- Turn Leftover Fries into Garlic Truffle Fries. It’s shockingly delicious, and a great way to reheat leftover french fries!

Crispy Baked Fries Seasoning Ideas
These baked french fries are so delicious because they can be made with all sorts of different flavors and seasonings – try some of these easy ideas, or come up with your own!
- Adding different powders and seasonings will help your fries take on new flavors easily – Try some of these or come up with your own!
- Add onion powder or garlic powder for a bit more flavor.
- Add herbs de provence salt for a rustic French twist on your baked fries.
- Cajun seasoning sprinkled over the fries gives a spicy Five Guys like french fry flavor.
- Brush fries in the final 15 minutes of baking time with butter, diced garlic, and finely diced parsley for a sinfully rich garlic butter fries recipe.
If you love this easy baked french fry recipe, be sure to check out some of my other favorite easy recipes!

Also try my favorites like The Best Air Fryer French Fries Recipe, Easy Fogo De Chao Brazilian Cheese Bread Copycat Recipe, Easy Baked Sweet Potato Chips, Paleo Garlic Parmesan Zucchini Fries, Cheesy Sausage Potatoes and Cabbage, One Pot Cheesy Taco Skillet, The Best Easy Slow Cooker Shredded Chicken Recipe, The Best Baked Garlic Pork Tenderloin, and Easy Baked Pork Chops Recipe.
If you love the best easy crunchy baked fries recipe as much as I do, please give it a five star review and help me share on facebook and pinterest!

Only have 30 minutes to get dinner on the table? Sign up for my 30 minute dinner plans direct to your inbox!
Find and shop my favorite products in my Amazon storefront here!
Crunchy Baked Fries

Equipment
Ingredients
- 3 large russet potatoes
- 2-3 tablespoons olive oil
- Sea salt and pepper, to taste
Instructions
- Using a mandoline, slice the potatoes into fries. I don't worry too much about the size of fry I am making- some are bigger, and some are smaller. That's fine!
- Next, place your spuds in a nice cool water bath. Completely submerge the fries in water.
- Let fries sit one hour. This helps to remove excess starch and will help the fries crisp up more in the oven.
- After an hour, drain the water, and pat fries dry with a paper towel.
- Toss with a couple tablespoons of olive oil, salt and pepper.
- Spread out onto a baking sheet which has been generously sprayed with cooking spray (two if the sheet is too crowded- fries should not be super packed on the sheet).
- Bake at 400 for about 30 minutes- until fries start to get soft.
- You might want to stir the fries at this point to prevent excessive sticking and to flip the fries to the other side.
- Turn the oven to 450 and continue baking until crisp (about 20-30 minutes).
- If you get in a hurry, turn on the broiler to crisp up the fries- but watch them closely, and stir them a few times to be sure all sides get some good crunch!
Video
Nutrition
Nutrition information is automatically calculated, so should only be used as an approximation.


Just made these fries and they came out exactly as described! Full of flavor and crunchy! Added some paprika and garlic to them – chefs kiss! I’ve been looking for a way to make crunchy fries at home and am so happy I found your recipe, thanks so much for sharing!
Thank you so much!
Very very good! I pretty much following the baking directions….give or take a few minutes. I put on parchment paper so didn’t stick to pan. I didn’t measure olive oil and just squirted on in a bowl, covered and shook and turned upside down. I forgot to dry off in paper towel….but still very good!